Thursday 31 January 2013

DIY Flower Crowns

Okay ladies, let's be honest. How many of you envisioned when you were a little girl, that one day Prince Charming would come along and whisk you off your feet? To have your very own Disney-themed fairytale ending? If you're nodding your head with stars in your eyes, I know exactly how you feel!

However now that we're all grown up, we understand that it's a bit more complicated than just pricking our finger on a magic needle and being awoken by true love's kiss... (I'm hoping one day one of my afternoon sleep-ins will result in a wakeup smooch from Ryan Gosling - a girl can dream!). But even if we can't be a princess in real life, we most definitely can dress like one!

Today's post is all about how to make your own Flower Crown - something the inner princess in you will adore, and something that will add a bit of fairytale whimsical charm to any outfit!

Taken By Surprise Tutorial: Flower Crowns


What you will need: 
- Two bunches of fake flowers
(I suggest choosing a bunch all of one colour, and then a mixed bunch)
- A plain black alice-style headband
- Green tape
(you can buy this from the florist)
- Wire cutters or strong scissors
- Pliers

1. Using your scissors or wire cutters, trim your flowers so they have about 4cm of stem left. Try to keep any leaves or little flowers intact as they add to the overall effect!


2. Choose what flowers you would like to use and "draft" your design by arranging the flowers along the headband. I chose blue as my focus colour and added a purple and white flower to mix it up. You can use whatever flowers/colours you like, though I suggest using the same types of flowers (all roses, all gerberas, etc.) to make it evenly spaced.

3. With the trimmed stem, wind it around the headband in your desired placement. Use pliers to help bend the wire if need be. The flower should be fairly secure.

4. Using the green tape, cover the stem by wrapping the tape around the stem and headband in a crossing pattern to securely attach the flower to the headband. 


5. Continue to do this until all of your flowers are attached, then cover up any gaps using more green tape. If your stems are pointy, the green tape will also help smooth them out so you don't have things jabbing into your head!

Now you have your very own flower crown!


I also sell my crowns on Etsy at CrownedByFlowers; come by if you would like!

What colour(s) would you make your flower crown? Let me know in the comments below!


Share:

Wednesday 30 January 2013

Tea Bag Cookie Recipe & DIY Tags

Hi everyone!

To celebrate my 20th birthday (yay!), my nearest and dearest and I went for a cute little picnic in the St Kilda Botanical Gardens. It was a super lovely afternoon, and it made me really understand why my parents love it so much when the whole family is home - having all of my favourite people in one place is really special, and I felt so lucky to have them all there with me :) Stay tuned for my polaroid snaps from the day later in the post :)

Everyone brought a plate of food to share, and I had spent the night before making these adorable little cookies to bring, which I'm going to explain how to make below. These would also make cute party favours or small gifts!


Tea Bag Cookie Recipe


I just used a standard cookie recipe to make the biscuits, and you can use whatever recipe you like or know best. For reference, here is the one I used:

Ingredients:
250g butter, softened
3/4 cup caster sugar
1 egg
1 tbs water
2 1/4 cups plain flour
1/2 tsp vanilla essence

Method:
1. Beat the butter, sugar, egg, vanilla essence, and water with an electric mixer until combined and creamy.
2. Stir in the flour in two batches. Knead dough on a floured surface (table/board/etc) until smooth. Then cover with cling wrap and refrigerate for 30 minutes.
3. Preheat oven to 180 degrees C/350 degrees F. Line a baking tray with baking paper.
4. Roll dough between two sheets of baking paper to a 5mm thickness. To make the tea bag cookie cutters, I cut a rectangle of thin cardboard and folded it to shape, then taped the two ends together.

Cut your desired amount of cookies, then using a skewer, create small holes at the top of each cookie (for string to go through when they're cooked).

5. Bake for 15 minutes or until lightly browned. Allow to cool on trays.

Tea Bag Tags DIY


What you will need:
Sticky note book tags
Thin white thread
Scissors
A thick needle

Method:
1. Stick two tags together so the design is on both sides. My tags are from Typo, and for a set of about 100 it cost me under $5! Then trim to size, about 2cm long.


2. Poke a hole in the newly created label using the needle.


3. Cut a piece of thread about 10cm long and tie it to label by threading it through the hole and tying it in a double knot.


4. Repeat steps 1-3 until you have enough tags for your cookies.

Decorating


What you will need:
Your labels
1 cup milk chocolate melts
2 bowls, one small and one large enough for the smaller on to sit in
Boiling water
Baking paper

Method:
1. Thread the loose end of the tag string through the hole in the cookie and tie firmly. Now they really look like tea bags!


2. Melt the chocolate by placing melts in the small bowl, then placing the small bowl in the larger one and filling the large bowl with boiling water. Allow chocolate to melt, stirring occasionally if need be.


3. Dip the bottom half of each cookie int he melted chocolate, then place on baking paper to cool and for chocolate to harden.


Pop them in a pretty tin, then they're done!


What sort of biscuits do you like to put in your tea, or enjoy for afternoon tea? Let me know in the comments below!

Some of the snaps from my birthday <3


**Tutorial on how to make your very own flower crown seen above coming soon!**

Share:

Saturday 26 January 2013

How to style a straight fringe/bangs

If you have straight bangs, curling them to create some bounce and body is one of the easiest and best techniques to have in your beauty repetoire. Ask anyone with a straight fringe - having your hair stick to your forehead in warm weather, or fly all over the place in the wind is no fun! So trust me when I say to take the extra two minutes in the morning to add this to your routine, and you'll thank me!


Before we start, I must confess - While I have been sporting straight bangs for almost all of my life (except when I had the awkward half side/straight fringe in high school), I only JUST started styling my fringe over the last few months.

Exhibit A: Straight-fringed baby Jess
Why? Well, I have naturally very straight hair, so I tend to neglect styling it all together because I wake up and I'm happy to trust my tresses to do their own thing. That, and the one time I experimented with straightening my fringe ended up with kinks-galore and a burned forehead. Certainly not motivation for trying again!

BUT now I have the full bouncy fringe thing under control and looking pretty cute, I wanted to share my tricks with all of you straight-fringed girls in the blogosphere! And trust me, it will take you literally less than a minute to do and you'll look super polished with minimal effort.

Taken By Surprise Tutorial: How To Style A Straight Fringe/Bangs


What you will need:
- A straightener 
(a smaller one that isn't too wide will work best and minimise the risk of forehead burning)
- Hairspray (strength depending on the thickness of your fringe/bangs)
- a comb

Straightener -  Vidal Sassoon VSCS31A
Hairspray - L'Oreal Elnett Satin "Extreme Hold"
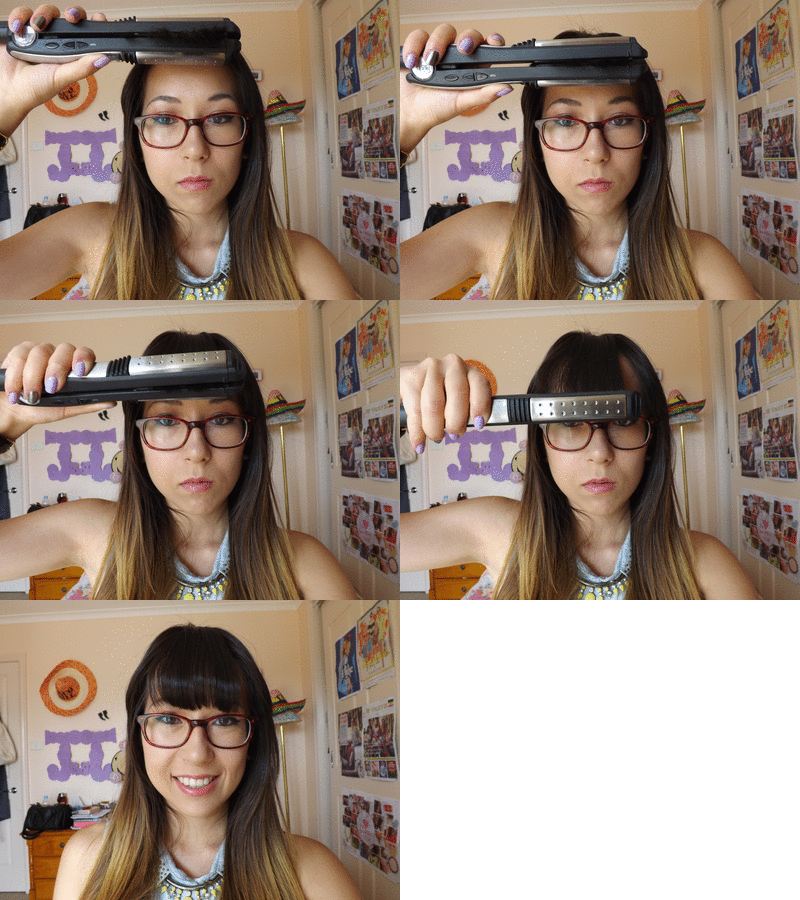
1. First up, comb your bangs so they're flat and tangle-free. Question: Why do they call them bangs? In Australia we call it a fringe, and only after watching international beauty vids have I heard them called "bangs". What does that even refer to?? At least fringe is like "hair that sits on the fringe of your face", but "bangs"? Sounds dangerous.


2. Split your fringe into three sections - a large centre section and two smaller side sections. We do this because we are going to curl each section in different directions. Don't try to get all of your fringe in the straightener - it's difficult and the end result won't look as good.

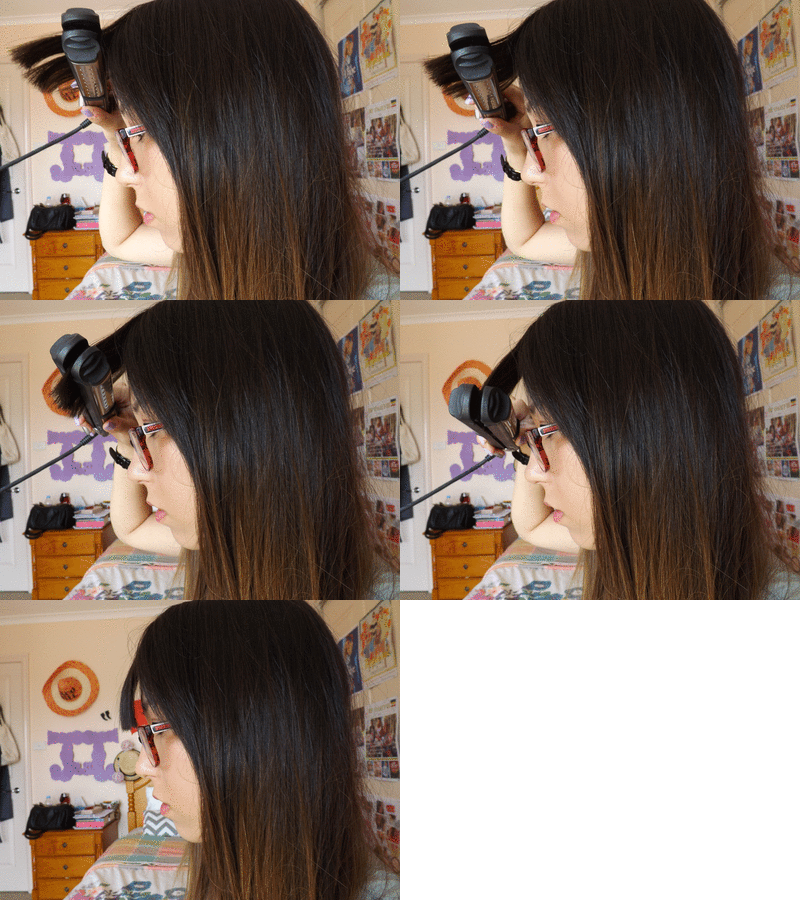
3. With your straightener set to 170 degress (that's Celsius, mind you), start from roots of the centre section and straighten away from forehead. Start to curve the straightener inwards about halfway down your fringe. If you don't get it right, just repeat this step until you're happy with how it looks.

Taken By Surprise Tip: Turn your straightener on while you're doing your eye makeup/last stage of your makeup, then it'll be ready to go!

pictures to animation
Yay, helpful GIF!
make a gif image
From the side
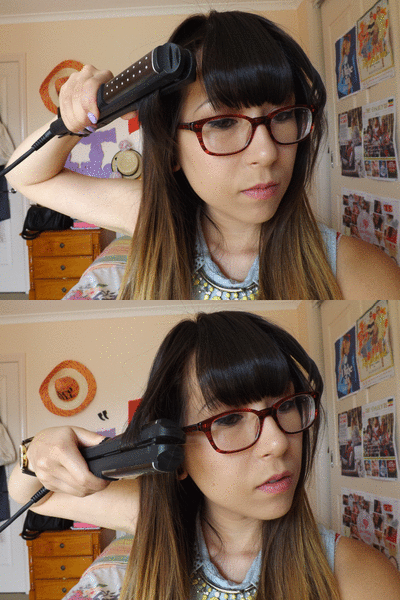
4. Do the same for each side section, except when it's time to curve the straightener, curve towards the centre to get that rounded look.

make gifs
5. You'll be left with gaps between each section, so using your comb, lightly comb the sections together.

My comb looks a bit like a crown here, I wish I actually had one like it!

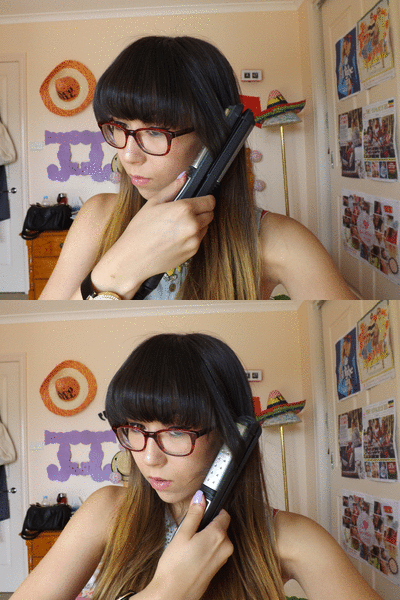
6. Now to style some pieces to frame your face! I think it's nice to have some wispy bits around your cheeks when you put your hair up, so take a small section from the front and curl it away from your face. Repeat for the other side too!


gif make
See! No blunt fringe with a ponytail, having pieces to frame your face is much prettier!
7. To finish off, lightly spritz your work with hairspray.


And we're done!


Trying to look like a cute K-pop star


Do you have any tips on styling a straight fringe/bangs? Let me know in the comments below!

Share:
© taken by surprise | All rights reserved.
Blogger Template Developed by pipdig